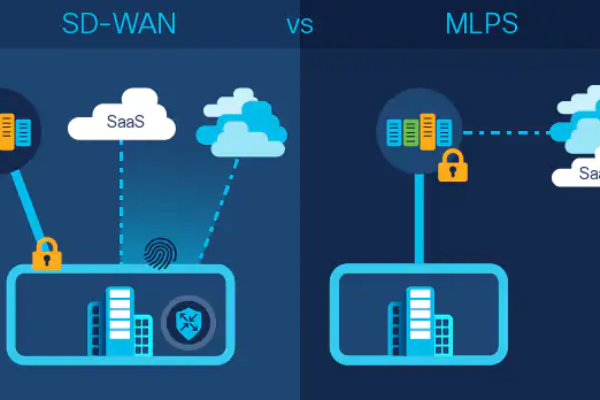
Shaped Round Robin notes – Egress Queuing on Cisco 3560-E & 3750-E

Below you can find SRR fast notes regarding Egress Queuing on Cisco 3560-E & 3750-E.

  • Shaped Round Robin (SRR)
  • SRR – shape mode (srr-queue bandwidth shape)  > BW restriction = policing
  • SRR – share mode (srr-queue bandwidth share) > guaranteed BW based on weight
  • shape overrides share
  • 4 egress queues
  • priority-queue out on an interface, it turns Queue 1 (always Q1) into priority queue
  • WTD – Weighted Tail Drop – queue length
  • queue set 1 is assigned to all ports by default
  • 0 (zero) means that queue works in the shared mode
  • queue can be configured per port basic

To show default queue configuration use below command:
Switch> show mls qos queue-set
Queueset: 1
Queue   :        1       2       3       4
----------------------------------------------
buffers   :      25      25      25      25
threshold1:      100     200     100     100
threshold2:      100     200     100     100
reserved  :      50      50      50      50
maximum   :      400     400     400     400
Queueset: 2
Queue   :        1       2       3       4
----------------------------------------------
buffers   :      25      25      25      25
threshold1:      100     200     100     100
threshold2:      100     200     100     100
reserved  :      50      50      50      50
maximum   :      400     400     400     400

Queue map
To map specific cos or dscp values to Queue 1,2,3 or 4 and to threshold 1 or 2 use below command, example shows that DSCP 16 17 18 19 will be assigned to queue 1 and threshold 1:
mls qos srr-queue output dscp-map queue 1 threshold 1 16 17 18 19
Queue configuration (queue-set) – buffer and threshold
Detail explanation of the Buffer, Memory and Thresholds allocation you can find in this post.
To configure the queue-set buffer percentage use below command:mls qos queue-set output QS-ID buffers Q1% Q2% Q3% Q4%
To configure the queue-set threshold values use below command:mls cos queue-set output QS-ID threshold Q1 DT1 DT2 RT MT

Egress Queue Buffer, Memory and Threshold Allocation on Cisco 3560-E & 3750-E

In the following post you can find details about egress Queue Buffer, Memory and Threshold Allocation on Cisco 3560-E & 3750-E. Hope this clarifies you the strange Cisco concept.

Buffer allocation is interface bandwidth allocation control how much data can be buffered and sent. Bandwidth is allocated as percentage of interface bandwidth (ratio weight of the frequency in which the SRR scheduler sends packets from each queue).

The buffer space (whole blue outline on the diagram) is divided between the Common Pool (yellow field) and the Reserved Pool (green, blue, orange, red areas are reserved pools for each queue). Cisco defined Common Pool as 400% of interface resources, so each queue is defined as 100% of interface resources. Each queue has reserved pool of interface resources, unreserved space is allocated to the Common Pool and can be used by remaining queues.

In case traffic in target queue has to consumed whole queue’s interface resources (100%) and even more over 100% then switch can allocate buffer space from the Common Pool (if it is not empty, what it means is that remaining queues don’t use all queues’ resources). If there are no free buffers in the Common Pool the switch drops the frames.

Let’s take a look on the following diawing example.

In this case Reserved Pool (Reserved Treshold) for queue 1 has been defined at the level of 80%, additionaly remaining unreserved pools from Q1, Q2, Q3 and Q4 tottaly 200% is is going to the Common Pool.

In case WTD Drop Threshold 2 that is on the level of 180% is exceeded the packets are dropped. Maximum Treshold for the Q1 is set on the level of 220% so up to this level traffic can be used from the Common Pool, but in this case it not a make sense because frames will be droped sooner due to WTD Drop Threshold 2.

OSPF Area Types and LSA Propagation

The idea of this post is to show the LSA propagation manner depending on area type.

OSPF routing protocol has hierarchical network topology that use concept of area. OSPF area reduces the protocol’s impact on CPU and memory. Resources can be saved by blocking the propagation of some type of LSA to specific areas. Lets recall the LSA types to see how they are propagated between areas.

LSA Types

  • LSA 1 – O, Router LSA contains all Link IDs – network, generated by every router and is local to the area
  • LSA 2 – O, Network LSA contains all routers attached to the segment, generated by DR and is local to the area
  • LSA 3 – O IA, Network Summary LSA describes network from another area, generated by ABR and is propagated between areas
  • LSA 4 – O IA, Summary ABR Link States, describes the presence of an ASBR, generated by the ABR and is propagated between areas
  • LSA 5 – O E1, O E2, External Link States, generated by ASBR and is propagated between areas
  • LSA 7 – O N1, O N2, NSSA External Link States, generated by ASBR into NSSA area and is propagated into area 0 as E1 or E2

Knowing the LSA types we have to state one important OSPF protocol rule that allows devides entire OSPF domain to smaler areas. A OSPF router must share an identical link-state database only with the other routers in its area, not with the entire OSPF domain. Does it mean for example that internal router in area 2 does not need to know about LSA generated by the internal router in area 1 or by ASBR in area 3 that redistributes routes from another routing domain.

Basically OSPF area types can be devided into three types: Normal/Standard Area, Stub Area and Not-So-Stubby. The difference is that Standard gets all LSA types but Stub and Not-So-Stubby Areas have some LSA limitation. It’s worth to mention that OSPF have few variations of Stub and Not-So-Stubby. Below you can find OSPF domain diagram that shows which LSA type is or is not propagated into specific area type and explanation of each area type.

Here you are the basic keyword and rule that help you understand the concept:

Words “Totally Stubby” = “no-summary” keyword in the area type command definition = no LSA Type 3,4 and 5 propagation into area instead ABR produce default route as Intra Area LSA (O*IA 0.0.0.0/0) into Totally Stubby Area.


Stub Area – area <area> stub

Allows propagation of LSA type 1,2 and 3  additionally with default route as Intra Area LSA format (O*IA 0.0.0.0/0)

Blocks propagation of LSA type 4 and 5

  • Stub area can not be a transit area for Virtual link, but a GRE tunnel can be used instead
  • Stub area can not have an ASBR
  • The Backbone area can not be configured as a Stub area
  • No LSA type 4 and 5 (E1 or E2) is allowed in a Stub area, but the routers in the Stub Area can connect to the External routes via the default route that is injected into the area by the ABR
  • Every router and the ABR of that area should have „area <area> stub” command
  • By default, the cost of the default route is 1
  • The cost of the default route can be changed by “area <area> default-cost <cost>”

Totally Stubby – area <area> stub no-summary  

Allows propagation of LSA type 1 and 2 additionally with default route as Intra Area LSA format (O*IA 0.0.0.0/0)

Blocks propagation of LSA type 3,4 and 5

  • This area has the same features as standard Stub Area
  • Only ABR has to be configured with the “no-summary” keyword in area definition
  • Intra area routers in the Totally Stubby area should have „area <area> stub” command only

Not-So-Stubby – area <area> nssa

Allows propagation of LSA 1, 2, 3 and 7

Blocks propagation of LSA type 3,4 and 5, no default route

  • All Intra Area routers in the Not-So-Stubby area should have „area <area> nssa” configured
  • Not-So-Stubby area can not be a transit area for Virtual link, but a GRE tunnel can be used instead
  • No LSA type 3,4 and 5 (E1 or E2) is allowed in a Not-So-Stubby area, but external routes can be injected into area and appear as LSA type 7, then translated on the ABR to LSA type 5
  • Not-So-Stubby area can have an ASBR
  • The backbone area can not be configured as a Not-So-Stubby area

Totally Stubby Not-So-Stubby – area <area> nssa no-summary

Allows propagation of LSA 1 and 2 additionally with default route as Intra Area LSA format (O*IA 0.0.0.0/0)

Blocks propagation of LSA type 3,4 and 5

  • This area has the same features as standard Not-So-Stubby the only one difference is that default route as Intra Area LSA format (O*IA 0.0.0.0/0) is produced

Not-So-Stubby – area <area> nssa default-information-originate

Allows propagation of LSA type 1, 2, 3 and 7 additionally with default route as LSA type 7 Eternal 2  LSA format (O*N2 0.0.0.0/0)

Blocks propagation of LSA type 4 and 5

  • This area has the same features as standard Not-So-Stubby the only one difference is that default route as LSA type 7 Eternal 2  LSA format (O*N2 0.0.0.0/0) is produced

Totally Stubby Not-So-Stubby – area <area> nssa no-summary no-redistribution

Allows propagation of LSA 1 and 2 additionally with default route as Intra Area LSA format (O*IA 0.0.0.0/0)

Blocks propagation of LSA type 3,4 and 5

  • This area has the same features as standard Not-So-Stubby the only one difference is that prefixes that have been redistributed on the ABR will not be propagated into area

QoS template – bandwidth dependency calculation

Cisco QoS features like LLQ and CBWFQ let us to prioritize and guarantee delay and bandwidth for defined class of traffic.
CBWFQ configuration allows to configure the BW requirements for specific class of service. First we have to defined the class and match the specific type of traffic, then assign BW limit in the policy that will be reserverd during interface congestion. Standard bandwidth command with BW in Kbps under class can be used for above. The drawback of this type of configuration is need to adjust the BW speed definition each time once we have changed the access speed.

IOS allows to tune the QoS configuration to define kind of QoS template that will use BW class ratio accross function similar devices without need for reconfiguration of BW parameters each time when access speed change. LLQ defines the priority queue for the delay sensetive traffic. Additionaly for business critical traffic CBWFQ needs to be configured. We have two options to confgure the QoS template: bandwidth percent and bandwidth remaining percent per class options.

I have defined 4 classes that will be used to presents configuration options.
class-map match-all TELNET
 match protocol telnet
class-map match-all HTTP
 match protocol http
class-map match-all SMTP
 match protocol smtp
class-map match-all VoIP
 match protocol rtp

Option 1 – bandwidth percent
First option to define BW template is to use bandwidth percent command instead of just bandwidth under class in policy map configuration. BW will be calculated based on the interface’s BW, so in case Fast Ethernet it will be 100Mbps. Priority percent 10 for PQ or bandwidth percent 10 in CBWFQ it’s 10% of 100Mbps.

By default, available interface BW is defined based on the physical port speed unless you configure the bandwidth command under interface to set access speed to something less (SLA access). Additionaly Cisco IOS has Default Class (class-default) with reserved the 25% of interface BW that match all undefined traffic (you can change it with max-reserved-bandwidth command under interface mode).

Let’s configure the first policy based on option 1:
R1(config)#policy-map LLQ
R1(config-pmap)#class VoIP
R1(config-pmap-c)#priority percent 10
R1(config-pmap-c)#class HTTP
R1(config-pmap-c)#bandwidth percent 10
R1(config-pmap-c)#class SMTP
R1(config-pmap-c)#bandwidth percent 50
R1(config-pmap-c)#class TELNET
R1(config-pmap-c)#bandwidth percent 30

The first way choice is to configure the bandwidth percent to fil 100% of interface speed, but due to class-default the available BW to share is 75%. In the above example we have defined 4 classed and assigned 100% of interface BW, here let’s try to assign the LLQ policy to the inerface:
R1#conf t
Enter configuration commands, one per line.  End with CNTL/Z.
R1(config)#int fa0/0
R1(config-if)#service-policy output LLQ
I/f FastEthernet0/0 class TELNET requested bandwidth 30%, available only 5%
R1(config-if)#

We can observe the error message that is saying that we have just 5% of available BW, this is due to 25% reserved for default class. OK so let change reserved BW for TELNET to 5%, assign policy to the interface and see the policy.
R1#show policy-map interface fastEthernet 0/0
 FastEthernet0/0
  Service-policy output: LLQ
    Class-map: VoIP (match-all)
      0 packets, 0 bytes
      5 minute offered rate 0 bps, drop rate 0 bps
      Match: protocol rtp
      Queueing
        Strict Priority
        Output Queue: Conversation 264
        Bandwidth 10 (%)
        Bandwidth 10000 (kbps) Burst 250000 (Bytes)
        (pkts matched/bytes matched) 0/0
        (total drops/bytes drops) 0/0
    Class-map: HTTP (match-all)
      0 packets, 0 bytes
      5 minute offered rate 0 bps, drop rate 0 bps
      Match: protocol http
      Queueing
        Output Queue: Conversation 265
        Bandwidth 10 (%)
        Bandwidth 10000 (kbps)Max Threshold 64 (packets)
        (pkts matched/bytes matched) 0/0
        (depth/total drops/no-buffer drops) 0/0/0
    Class-map: SMTP (match-all)
      0 packets, 0 bytes
      5 minute offered rate 0 bps, drop rate 0 bps
      Match: protocol smtp
      Queueing
        Output Queue: Conversation 266
        Bandwidth 50 (%)
        Bandwidth 50000 (kbps)Max Threshold 64 (packets)
        (pkts matched/bytes matched) 0/0
        (depth/total drops/no-buffer drops) 0/0/0
    Class-map: TELNET (match-all)
      0 packets, 0 bytes
      5 minute offered rate 0 bps, drop rate 0 bps
      Match: protocol telnet
      Queueing
        Output Queue: Conversation 267
        Bandwidth 5 (%)
        Bandwidth 5000 (kbps)Max Threshold 64 (packets)
        (pkts matched/bytes matched) 0/0
        (depth/total drops/no-buffer drops) 0/0/0
    Class-map: class-default (match-any)
      0 packets, 0 bytes
      5 minute offered rate 0 bps, drop rate 0 bps
      Match: any

Policy has been defined for Fast Ethernet so LLQ and CBWFQ have 75Mbps traffic reserved, below BW calculation details:

VoIP = 100Mbps * 0,1 = 10Mbps
HTTP = 100Mbps * 0,1 = 10Mbps
SMTP = 100Mbps * 0,5 = 50Mbps
TELNET = 100Mbps * 0,05 = 5Mbps

Option 2 – bandwidth remaining percent
Second option to define BW is to use bandwidth remaining percent command. The idea of this type of configuration is to first reserve the BW for the PQ thru priority percent command and next divides the available remaining BW between defined classes.
Let’s configure below:
R1(config)#policy-map LLQ
R1(config-pmap)#class VoIP
R1(config-pmap-c)#priority percent 10
R1(config-pmap-c)#class HTTP
R1(config-pmap-c)#bandwidth remaining percent 10
R1(config-pmap-c)#class SMTP
R1(config-pmap-c)#bandwidth remaining percent 50
R1(config-pmap-c)#class TELNET
R1(config-pmap-c)#bandwidth remaining percent 40
R1(config-pmap-c)#int fa0/0
R1(config-if)#service-policy output LLQ

For class VoIP priority percent 10 will be equal 100Mbps*0,1=10Mbps, BW Remaining is = (100-10)Mbps * 0,75= 67,5Mbps. So BW Remaining will be used as reference for all classes.
For class HTTP bandwidth remaining percent 10 will be equal BW Remaining*0,1 = 67,5Mbps*0,1= 6,75 Mbps.
For class SMTP bandwidth remaining percent 50 will be equal BW Remaining*0,5 = 33,75 Mbps.
For class TELNET bandwidth remaining percent 40 will be equal BW Remaining*0,4 = 27 Mbps.
By default Burst for Strict Priority queue is equal 20% of the PQ’s BW so 20% of 10Mbps, (10000000bitów/8)*0,2=250000B

R1#show policy-map interface fa0/0
 FastEthernet0/0
  Service-policy output: LLQ
    Class-map: VoIP (match-all)
      0 packets, 0 bytes
      5 minute offered rate 0 bps, drop rate 0 bps
      Match: protocol rtp
      Queueing
        Strict Priority
        Output Queue: Conversation 264
        Bandwidth 10 (%)
        Bandwidth 10000 (kbps) Burst 250000 (Bytes)
        (pkts matched/bytes matched) 0/0
        (total drops/bytes drops) 0/0
    Class-map: HTTP (match-all)
      0 packets, 0 bytes
      5 minute offered rate 0 bps, drop rate 0 bps
      Match: protocol http
      Queueing
        Output Queue: Conversation 265
        Bandwidth remaining 10 (%)Max Threshold 64 (packets)
        (pkts matched/bytes matched) 0/0
        (depth/total drops/no-buffer drops) 0/0/0
    Class-map: SMTP (match-all)
      0 packets, 0 bytes
      5 minute offered rate 0 bps, drop rate 0 bps
      Match: protocol smtp
      Queueing
        Output Queue: Conversation 266
        Bandwidth remaining 50 (%)Max Threshold 64 (packets)
        (pkts matched/bytes matched) 0/0
        (depth/total drops/no-buffer drops) 0/0/0
   Class-map: TELNET (match-all)
      0 packets, 0 bytes
      5 minute offered rate 0 bps, drop rate 0 bps
      Match: protocol telnet
      Queueing
        Output Queue: Conversation 267
        Bandwidth remaining 40 (%)Max Threshold 64 (packets)
        (pkts matched/bytes matched) 0/0
        (depth/total drops/no-buffer drops) 0/0/0
   Class-map: class-default (match-any)
      30 packets, 2851 bytes
      5 minute offered rate 0 bps, drop rate 0 bps
      Match: any

Above examples are Cisco recommended ways to deploye CE QoS configuration for different access speed port.

Group Encrypted Transport (GET) VPN technology overview

Group Encrypted Transport (GET) VPN is called as next-generation tunnel-less VPN technology but is not replacement for old good known DMVPN. GET and DMVPN are complementary technologies and can be deployed together. 

Due to slow come up of the DMVPN spoke-to-spoke tunnels where IPSec tunnels are built dynamically based on the NHRP and multipoint GRE tunnels, tunnel negotiation time have direct impact for delay sensitive data like voice and video. In this case GET VPN is a good replacement solution where voice and video needs to be transmited between branches and faster static IPSec keys configuration and policy is in place before data go thru.

The distibuted nature of today’s network applications like voice, video and multicast traffic, constant growth of network threats and risks, local, federal and industry regulations, highly confidential traffic in financial enviroment are a key factors for efficient and secure WAN branch to branch interconnectivity.

WAN architecture demands has changed over years from the point-to-point and point-to-multipoint to full mesh connectivity. In today WAN network infrastructure where MPLS technology provides full mesh network connectivity between all branches most companies are still using centralized point-to-multipoint model with not efficient and slow dynamic tunnel negotiation process.

GET VPN is recomended solution when time sensitive data has to be encrypted in addition to multicast appliction and dynamic routing is needed over MPLS WAN architecture with full mesh connectivity.

Following are key fetures of GET VPN that have advantage over traditional IPSec VPN:

  • WAN transport full mesh encryption services on demand
  • Tunnel-Less Any-to-Any IPSec VPNs
  • Native routing
  • IP header preservation
  • Centralized key and policy management
  • Advanced QoS
  • Multicast connectivity
  • Reliability and redundancy of architecture

The key components of GET VPN are GDOI protocol, Key Server and Group Member.

Group Domain of Interpretation (GDOI) (RFC 3547)

  • Uses UDP 848
  • Cryptographic protocol for group policy/key management and distribution
  • Works based on ISAKMP
  • Establishes security associations between authorized group member routers
  • Uses two different encryption keys: Key Encryption Key (KEK) – key used to secure the control plane, Traffic Encryption Key (TEK) – key used to encrypt data traffic

Key Server (KS)

  • Authenticates Group Member (GM)
  • Distributes IPSec keys and policies to all registered and authenticated GMs
  • Perform rekey process

Group Member (GM)

  • Registers with KS to download IPSec VPN policy
  • Encrypts/decrypts traffic between among GMs in the same Group

GET VPN process can be divided on the following 5 steps.

  • Registration of GMs in the KS
  • Authentication and authorization of GMs by the KS
  • IPSec SA policy propagation from KS to GMs
  • GM encrypt/decrypt traffic based on group policy
  • Rekey process – IPSec SA keys replacement propagation 

In next post I’m going to provide you more process details and configuration example with GET VPN.

AAA new-model issue

Brand new Cisco router or switch has just console access enabled, so by default you can log go in to the console over rollover cable without any passwords.

Before we start with the authentication and authorization let’s fast recall the background. Cisco IOS CLI has two base following command modes:

  • User EXEC mode – Router> (angle bracket sign)
  • Privileged EXEC mode (enable mode) – Router# (pound sign)

We will configure AAA fetures on R1 and then telnet from R2 to R1 to test the impact on the authentication and authorization process to Console and VTY and AUX lines. First we have to enable the AAA access control system, new system, btw I haven’t seen old one yet :).
R1 con0 is now available
Press RETURN to get started.
R1#en
R1#conf t
Enter configuration commands, one per line. End with CNTL/Z.
R1(config)#aaa new-model
R1(config)#

From the Console perspective no change, still no authentication and authorization, just click Enter twice unltil enable secret password is not defined, for VTY and AUX LOCAL authentication is enabled for privilege level 1 (based on the router’s local usernames database). Username and password needs to be defined on the router, enable secret password is needed for level 15, if not defined „% Error in authentication.” message will be displayed.

OK so let’s add below on R1 and look what is going on once we telnet from R2:
R1(config)#username netcontractor privilege 15 secret netcontractor
R1(config)#enable secret netcontractor
R1#debug aaa authentication

R2#telnet 10.0.0.1
Trying 10.0.0.1 ... Open
User Access Verification
Username:

R1#
*Mar 1 02:35:50.723: AAA/BIND(0000002A): Bind i/f
*Mar 1 02:35:50.731: AAA/AUTHEN/LOGIN (0000002A): Pick method list 'Permanent Local'

Router takes 'Permanent Local’ – default method that has been enabled once we enter aaa new-model command.
Username: netcontractor
Password:
R1>en
Password:

Once we click enter we get prompt for enable password, below output from R1 after enter has clicked
R1#
*Mar 1 02:35:59.911: AAA: parse name=tty66 idb type=-1 tty=-1
*Mar 1 02:35:59.915: AAA: name=tty66 flags=0x11 type=5 shelf=0 slot=0 adapter=0 port=66 channel=0
*Mar 1 02:35:59.919: AAA/MEMORY: create_user (0x647AD6E0) user='netcontractor' ruser='NULL' ds0=0 port='tty66' rem_addr='10.0.0.2' authen_type=ASCII service=ENABLE priv=15 initial_task_id='0', vrf= (id=0)
*Mar 1 02:35:59.923: AAA/AUTHEN/START (2046019537): port='tty66' list='' action=LOGIN service=ENABLE
*Mar 1 02:35:59.927: AAA/AUTHEN/START (2046019537): non-console enable - default to enable password
*Mar 1 02:35:59.927: AAA/AUTHEN/START (2046019537): Method=ENABLE
*Mar 1 02:35:59.931: AAA/AUTHEN(2046019537): Status=GETPASS

Router starts authentication process for user netcontractor using default method as enable password (Method=ENABLE). Default is taken because aaa authentication enable command has not been defined. Next router sends a GETPASS request to prompt for the password.
Enable password: netcontractor, click enter.
Password:
R1#

R1#
*Mar 1 02:36:10.855: AAA/AUTHEN/CONT (2046019537): continue_login (user='(undef)')
*Mar 1 02:36:10.859: AAA/AUTHEN(2046019537): Status=GETPASS
*Mar 1 02:36:10.859: AAA/AUTHEN/CONT (2046019537): Method=ENABLE
*Mar 1 02:36:10.955: AAA/AUTHEN(2046019537): Status=PASS
*Mar 1 02:36:10.955: AAA/MEMORY: free_user (0x647AD6E0) user='NULL' ruser='NULL' port='tty66' rem_addr='10.0.0.2' authen_type=ASCII service=ENABLE priv=15 vrf= (id=0)
Router takes entered password for enable method and confirm with PASS response to indicate a successfull login.
Once we add below to the R1:
R1(config)#aaa authentication enable default nonethen after username and password authentication no propmpt for Password is send from the R1
R2#telnet 10.0.0.1
Trying 10.0.0.1 ... Open
User Access Verification
Username: netcontractor
Password:
R1>en
R1#

Router uses defined default list with NONE method – so once user enter enable command will be taken to the privilage level 15.
R1#
*Mar 1 03:05:10.447: AAA/BIND(0000002E): Bind i/f
*Mar 1 03:05:10.459: AAA/AUTHEN/LOGIN (0000002E): Pick method list 'Permanent Local'
R1#
*Mar 1 03:05:20.695: AAA: parse name=tty66 idb type=-1 tty=-1
*Mar 1 03:05:20.695: AAA: name=tty66 flags=0x11 type=5 shelf=0 slot=0 adapter=0 port=66 channel=0
*Mar 1 03:05:20.699: AAA/MEMORY: create_user (0x647AD6E0) user='netcontractor' ruser='NULL' ds0=0 port='tty66' rem_addr='10.0.0.2' authen_type=ASCII service=ENABLE priv=15 initial_task_id='0', vrf= (id=0)
*Mar 1 03:05:20.703: AAA/AUTHEN/START (1933181644): port='tty66' list='' action=LOGIN service=ENABLE
*Mar 1 03:05:20.707: AAA/AUTHEN/START (1933181644): using "default" list
*Mar 1 03:05:20.711: AAA/AUTHEN/START (1933181644): Method=NONE
*Mar 1 03:05:20.711: AAA/AUTHEN(1933181644): Status=PASS
R1#
*Mar 1 03:05:20.711: AAA/MEMORY: free_user (0x647AD6E0) user='netcontractor' ruser='NULL' port='tty66' rem_addr='10.0.0.2' authen_type=ASCII service=ENABLE priv=15 vrf= (id=0)

In case we would authenticate and authorize access to the console (as I have mentioned console means connection over serial – rollover cable) we have to enable authentication for line 0 explicity not just enter aaa new-model (local authentication after aaa new-model command works for all lines beside console line 0 = CTY). Below commands are enough to place user on the level 15 once enter username and password.
R1(config)#aaa authentication login default local
R1(config)#aaa authorization console

What about VTY lines authorization? We would achieve authorization for user, so once we log on over VTY lines (telnet or ssh) to the router with username and password we will be placed in the privileged EXEC mode level 15 automatically. Solution is simple, we have to configure exec authorization with local method – just one line.
R1(config)#aaa authorization exec default local
R1#debug aaa authorization
AAA Authorization debugging is on

Once we log on and enter username and password router takes default authorization list and with local method, user use placed on to the respective privilage level based on the username netcontractor privilege command.
R1#
*Mar 1 03:22:49.691: AAA/AUTHOR (0x30): Pick method list 'default'
*Mar 1 03:22:49.707: AAA/AUTHOR/EXEC(00000030): processing AV cmd=
*Mar 1 03:22:49.707: AAA/AUTHOR/EXEC(00000030): processing AV priv-lvl=15
*Mar 1 03:22:49.707: AAA/AUTHOR/EXEC(00000030): Authorization successful

Above are basic but very important issues to understand AAA.